Alright, before you start fixing up those cracks and chips on your beloved glass surface, make sure you have these essentials ready to roll. Firstly, grab yourself some repair resin – you’ll need this to work its magic and restore your glass to its former glory. Next up, get your hands on a repair kit that typically includes tools like a syringe for precise application, curing strips to ensure a seamless finish, and some polishing compound to give that final touch of shine.
Additionally, don’t forget to have some protective gloves handy to keep your hands safe during the repair process. And remember, good lighting is key, so make sure you have a well-lit workspace to get a clear view of the damage you’ll be fixing. Now that you’ve got all your materials lined up, it’s time to dive into the nitty-gritty of repairing that glass – let’s get to it!
Before diving into the repair process, make sure to gather all the necessary materials. Grab your repair resin, a syringe applicator, a curing strip, and a razor blade for removing excess resin later on. Additionally, have a clean cloth and some polish on hand for the finishing touches.
Next up, prep your work area by making sure the surface is clean and dry. You don’t want any dirt or moisture interfering with the repair process. If the damage is significant, consider using a drill with a small bit to create a path for the repair resin to flow into smoothly. And remember, patience is key when it comes to prepping for a successful repair job.
Okay, so you’ve noticed a pesky little chip or crack on your windshield – bummer! Now, before you panic, let’s take a closer look at the damage. First things first, assess the size and depth of the chip or crack. Is it just a small star-shaped ding or a longer crack spreading across the glass?
Next up, determine if the damage has extended to the inner layers of the windshield. Run your finger over the area – if you can feel the crack with your nail, chances are it’s gone beyond the surface layer. Also, keep an eye out for any dirt or debris that may have lodged itself into the crack, as this can affect the repair process.
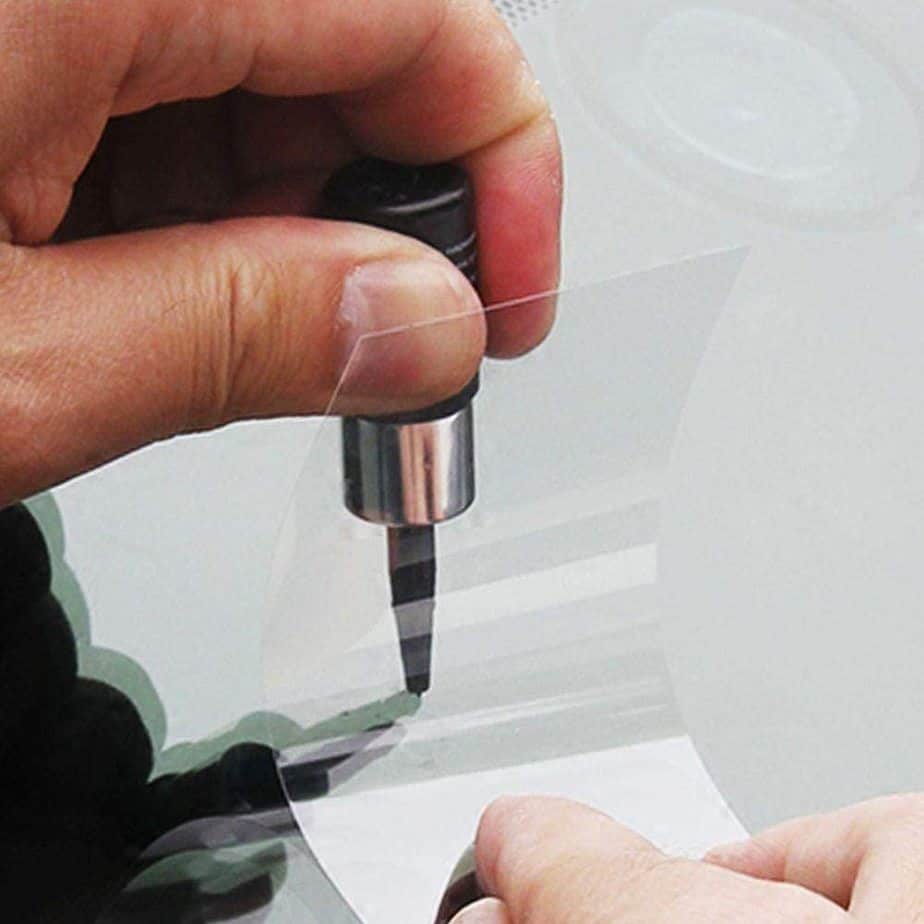
Once you’ve assessed the damage and gathered all the necessary materials, it’s time to get down to business and apply the repair resin. Remember to work in a well-ventilated area and wear protective gloves to keep your hands clean. Start by carefully squeezing a small amount of resin onto the damaged area. Use a plastic applicator or a razor blade to spread the resin evenly over the surface, ensuring it fills in all the cracks and chips. Don’t worry if you apply too much resin – you can always remove the excess later on.
After applying the repair resin, it’s important to give it enough time to cure properly. Follow the manufacturer’s instructions regarding the curing time, as this will vary depending on the type of resin you are using. Typically, you will need to leave the resin to cure for at least a few hours, or even overnight for best results. Once the resin has cured completely, you can move on to the next step of removing any excess resin and polishing the repaired surface to make it look as good as new.
Alright, once you’ve applied the repair resin, the next step is to let it cure. This is crucial for a successful repair job. Curing the resin basically means allowing it time to harden and bond with the damaged area. Depending on the type of resin you’re using, it might need to be exposed to UV light or simply left to air dry.
The curing time can vary depending on the product, so make sure to read the instructions carefully. Generally, it can take anywhere from a few minutes to several hours. It’s important to be patient during this step to ensure that the resin sets properly. Once the resin is fully cured, it should be hard to the touch and securely bonded to the surface.
After applying the repair resin to the damaged area and allowing it to cure properly, the next step in the repair process is removing any excess resin. This step is crucial to ensure a smooth and seamless finish to the repair job. To do this, gently sand the repaired surface using sandpaper until the excess resin is leveled with the surrounding area.
Be careful not to apply too much pressure while sanding, as you don’t want to damage the repair or create an uneven surface. Once you have removed the excess resin and achieved a smooth finish, wipe down the area with a clean cloth to remove any dust or debris. This will prepare the surface for the final step of polishing to further enhance the appearance of the repair.
With the surface now smooth after removing excess resin, it’s time to bring out the shine. Polishing is the final step in restoring the visual appeal of the affected area. Using the right cleaning items makes a huge difference. Start with a clean microfiber cloth, apply a small amount of polishing compound in circular motions until the surface gleams.
Remember to buff the area gently, allowing the compound to work its magic without applying too much pressure. This process not only enhances the appearance of the repair but also ensures a seamless finish. Take your time with this step, as a little extra effort in polishing can make a big difference in the overall outcome.
Alright, time to take a good look at our handiwork. Start by examining the repair closely. Look for any signs of inconsistencies in the resin application or spots that need some extra attention. If everything looks good, move on to checking the surface for smoothness and evenness. Run your fingers over the repaired area to feel for any bumps or rough patches that may need to be fixed.
Once you’ve checked the visual and tactile aspects, give the repair a thorough inspection for any possible air bubbles or imperfections. Lightly tap the surface to listen for any hollow sounds that could indicate trapped air. If you come across any issues, don’t worry, a touch-up with some more resin can easily fix them. Remember, the key is to ensure that the repair is seamless and blends in perfectly with the surrounding surface.
You will need repair resin, a repair kit, a microfiber cloth, a polishing compound, and a clean cloth.
Clean the surface thoroughly with a mild detergent and water, then dry it completely before proceeding with the repair.
Inspect the damaged area closely to determine the size and depth of the damage, as this will help you determine the amount of repair resin needed.
Follow the instructions provided in the repair kit, ensuring that the resin is applied evenly and smoothly over the damaged area.
Allow the resin to cure for the recommended amount of time, typically 24-48 hours, before moving on to the next steps in the repair process.
Use a clean cloth or razor blade to carefully remove any excess resin, ensuring that the repaired area is smooth and even.
Apply a small amount of polishing compound to a microfiber cloth and gently buff the repaired area until it is smooth and shiny.
Inspect the repaired area closely for any signs of remaining damage or imperfections, ensuring that the surface is smooth and restored to its original appearance.

Leave a comment